
Let me start out with the most important thing for me and likely others. The price I paid for what I put together and the exact components I used.
USD Pricing and Components
Items Commissioned to Designedby3d
Helmet: $250
Vest: $370
Shipping for both: $73
Off the Shelf Essentials
White Long Boots: $49.99 + $7.99 Shipping
Blue Unitard: $25.99
Blue Balaclava: $5.99

So in total I paid around $860 or more exactly $855.91. With likely more simply due to the additions of a dance belt, a set of soles for the boots, and some padding for the helmet. Which in hindsight kinda makes me feel like this.

But I still do feel like it was a worthwhile "investment" despite that hefty price tag.
The whole thing about this is that if I had time and know how I could easily whittle this down to a price of $200 bucks total for the helmet and vest together. And if I wanted to skimp on the stuff I got off the shelf I would likely be spending half of what I spent for the gloves and boots.
Great examples being
Even better is that if you wanted to get your helmet and vest made by the people that made mine all you are paying for is the shipping, assembly, and materials. While I cannot be certain how much design cost me, a price reduction would likely be there. Something that after talking directly with Designed by 3D they have assured me that if anyone came to them wanting the same stuff they wouldn't need to pay for design work so the price would likely be lower.
So something around $250 - $325 bucks on the lowest end isn't terrible in comparison but I feel with the right skills and luck it might even go lower. Then considering the prior price tag it doesn't seem that bad in comparison.
BUT what if you do want to make the vest and helmet yourself? Well I got news for you I have the exact paints for reference used to paint the parts and even the paint lookups for some of them.
Paints
As Designedby3D currently works out of the Ukraine their selection of paints are a different brand than anything that I can find here. They mainly used paints from a company called Art Kompozit who is also stationed out of the Ukraine. They have an English version of their site here but I have been unable to contact them for whatever reason. Feel free to try and try to talk to them if you want but don't get your hopes up too high. -EDIT I've recently gotten a response from contacting the company and the're happy to ship to the United States. I was also able to get an name for the mettalliq paints mentioned!
The Paints for the Costume
Art Kompozit Acrylic 370 (Cobalt Light Blue)
Art Kompozit Acrylic 018 (Titanium White)
Art Kompozit Metalliq Acrylic Enamel Gold
Art Kompozit Metalliq Acrylic Enamel Silver
So while the color codes for the Gold and Silver are something I'm unable to figure out for the other two do have the color numbers for the pigments available. If you want a better explanation of what color numbers are, each number corresponds to a certain pigment when they are all mixed together you get the paint of the exact color. Handprint explains it the best but it still is kinda confusing.
Color Numbers
Cobalt Light Blue PW6/PB15:3/PV23/PB29
Titanium White PW6
Using these numbers the Titanium White is the easiest to find, honestly any acrylic paint with the name Titanium White should work just fine. Paint 1 Paint 2
The Cobalt Light Blue is much harder. This is mainly because they took a common Cobalt Blue and modified it with PV23 which is a purple pigment. Or they modified a Light Blue Violet with a PB15:3 which is a blue pigment. Either mixing the pigments together yourself or going with PW6/PB15:3/PB29 (Cobalt Blue Hue) or PW6/PV23/PB29 (Light Blue Violet).
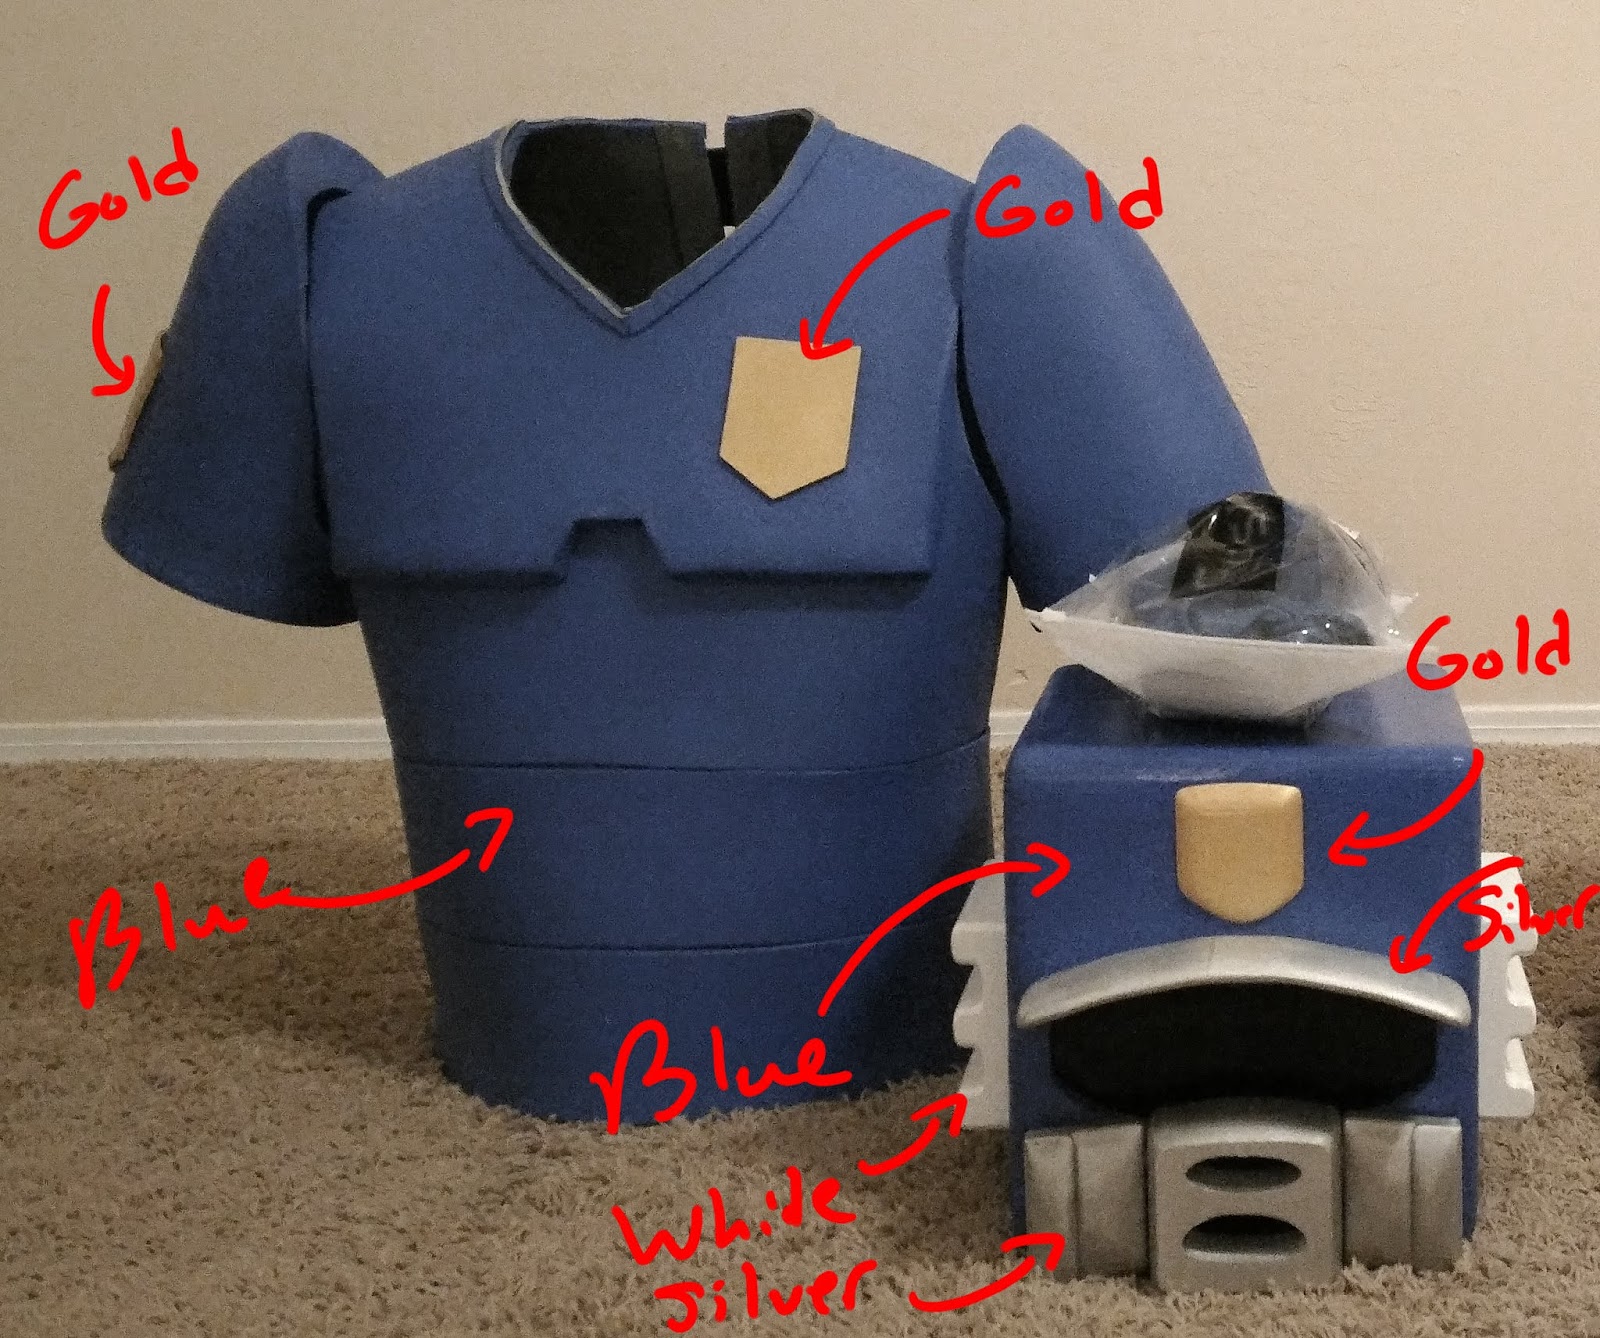
Now for the Gold and Silver I don't have codes or anything but my best bet is to try some metallic acrylic paints in those colors yourself. All I was given for the colors were pictures of the jars with no defining markings available. -EDIT Art Kompozit has given me the names for these metallic paints. Silver is Metallic Platinum and Gold is Gold Light.
Now likely the most important part is where these paints are located on the cosplay itself. Using the picture bellow I hope that should be cleared up.
Mods and Important Facets of Commissioned Items
When I commissioned the vest it had this sort of collar thing going on. This was lopped off because it made wearing the helmet near impossible. There is also a ring I attached to the inside of the vest to store my car keys because this cosplay has no pockets to speak of. Finally while this isn't something that I've done or likely will do to the cosplay the vest should have the top and bottom parts separated to allow its user to be able to sit down without the whole thing popping up to hit the helmet. Stormtrooper armor is likely the best example of what I mean as the top and bottom parts of their chest armor are separate allowing for actual articulation in the costume. With the way the current vest is set up it's entirely rigid. Which is kinda terrible for anything other than standing.
 |
| Great example but other chestplates share this design for the same reason. |
Pictures


Additions to the Cosplay
As mentioned there are a couple of items that I got for this cosplay that I feel were kinda extraneous yet are important in their own right.
The first of these is the dance belt, something that I feel should be heavily suggested for any guy who wants to put together anything with full body spandex. Buy a good dance belt, keep it clean and wash it after use and you'll likely have it work for years to come. It will conceal your bulge and not make a picture turn into something that needs to be photoshopped if you were thinking about something just a bit arousing. It also makes sure that your package doesn't flop around so unless you're going to tuck for cosplay a dance belt or a good foam pad is your best bet.
Secondly are some good soles for the boots you're getting. For me the reason was more that I got some wide feet so I needed to get bigger boots. As such I got some really thick soles for my boots. Even if you don't have that problem you are going to be standing around a ton with most cosplays and this one is no different. Get something you are willing to have support you for hours of standing because every bit will help.
Third see about finding some way to store a straw or two on you. With a straw drinking with the helmet is doable.Without you got to take off the helmet to drink. Trust me that you will be drinking a ton while in this cosplay. If you don't got a straw you're going to be looking like this an awful lot at the con.

Finally we have something that will likely vary for each person. That being helmet padding. Depending on how well you or the person commissioned pads your helmet you might need to add extra padding to make it a better fit. This was the case for me and I personally used these which were pretty good quality. Essentially you want your helmet to fit snug but not too snugly on your head while wearing it. Getting additional padding can help you better fit it to your head if you got a bit of a bad fit or simply want to improve yours.
My Experience with Designedby3D
This last part is a bit of a way for me to help those that want to talk to my commissioner to get their stuff commissioned as well. Designed by 3D are cosplay making folks who work out of the Ukraine. Despite this the very few issues that cropped up in the design and making of this cosplay they were well addressed and I feel that the experience that I had commissioning them was pretty good. However given my prior experience getting cosplay stuff commissioned was nothing it might be best to elaborate.
To start out while a language barrier does exist I wasn't needing to pull up google translate every time I wanted to make a suggestion. The people at Designed by speak English rather well and likely deal with alot of US and UK customers already. At the worst their English was a tad shaky and they seemed to pretty well understand what I was requesting and suggesting.
Secondly there were some small mistakes I noticed when I got my first got my items in from Designed by. The main one being that my helmet was much too small. It seemed they had gone a little overboard with the padding and as such I would get carpet burn on my ears just by putting it on. Second was the rebreather was not able to be breathed through, something that I had suggested and they had agreed to do. After contacting them and expressing the problems found they were happy to fix the problem free of charge by sending me a bigger and properly ventilated helmet. Something that I only needed to pay shipping for and that they were happy to do.
Last was honestly how nice their customer service was and their communication. Before I settled on Designed by I had contacted several other places to see if they could do the commission I wanted. Most that got back to me said they didn't do the stuff I wanted and most simply didn't contact me back. Designed by throughout the design and assembly were incredibly responsive despite the time change from me to them. As I mentioned prior I would be more than happy to work with them again if I needed to just due to this aspect alone.
Conclusion
So that's about it. Honestly I enjoyed doing this as much as I enjoyed putting together the cosplay in general. I also hope that anyone interested in following this "tutorial" who needs some help feels free to contact me with any questions I might be able to provide. Just keep in mind I've never done work with foam or helmet making before so I'm probably going to be useless in that regard.
Email: mewbusi@gmail.com
No comments:
Post a Comment